VRmat Editor
This page provides information on the V-Ray VRmat Material Editor.
The V-Ray VRmat Material Editor is no longer supported in V-Ray Next for 3ds Max.
Overview
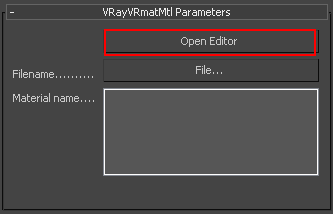
The V-Ray Material Editor creates, edits, and saves multiple materials into a .vismat or .vrmat file that can be opened by other scenes. To access the V-Ray Material Editor, create a V-Ray VRmatMtl material in the 3ds Max Material Editor, then click Open Editor.
UI Path:
||Material Editor window|| > Select VRayVRmatMtl > Parameter Editor > VRayVRmatMtl Parameters rollout > Open Editor button
UI Layout
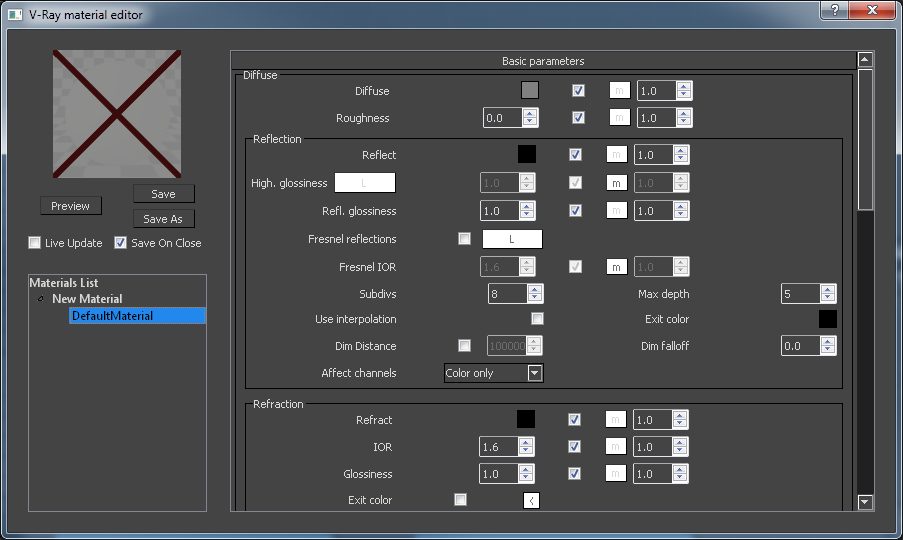
Material preview – A preview render that shows the appearance of the adjusted material. Once you have made a material preview, the preview image is cached for later use.
Preview – Updates the material preview.
Save – Saves the current material(s) to a .vismat file overwriting previously existing files.
Save As – Opens a dialog to specify where you want the material(s) to be saved.
Live update – When enabled, the material preview will update automatically every time one of the material properties is changed.
Save on close – Automatically saves the changes made to the materials to a .vismat file once the editor is closed.
Materials List – A list of all materials in the current .vismat or .vrmat file. You can create new materials, import materials from file, rename materials, and delete them.
Material options – All the available options for the currently selected material.
Working with the V-Ray Material Editor
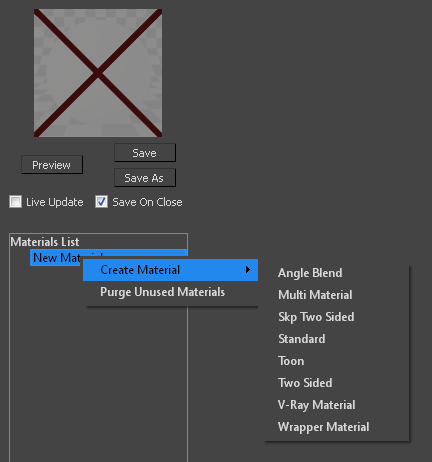
In the Material List section of the V-Ray material editor, you can see a tree structure of all the materials contained in the current .vismat file. Here you can create new materials, rename, and delete them. You can also stack layers of materials.
Right clicking at the root allows you to create a new material from the Create Material sub menu. The available materials are Angle Blend, Multi Material, Skp Two Sided, Standard, Toon, Two Sided, V-Ray Material, and Wrapper Material.
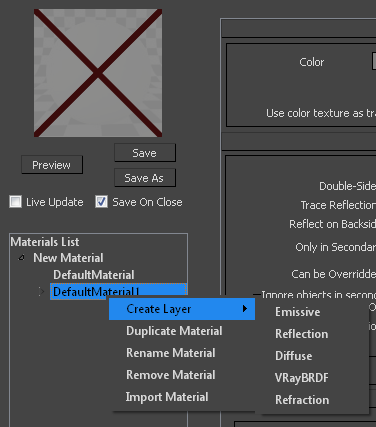
Right clicking on a Standard material allows you to create additional layers on top of it. The available layers are Emissive, Reflection, Diffuse, VRayBRDF, and Refraction.
You can also right click on any material and choose one of the following options:
Duplicate Material – Creates a copy of the current material.
Rename Material – Allows you to specify a name for the current material.
Remove Material – Deletes the specified material from the .vismat library.
Import Material – Opens the open file menu to import a .vismat library.
Materials
The materials list allows the user to create a wide range of shaders by combining different layers and blending them together.
Note: In order to see through the diffuse and Emissive layer you will need to add transparency to the layer.
Diffuse

Color – The diffuse color of the material. Note: the actual color of the surface also depends on the reflection and refraction colors.
Transparency – Controls the transparency of the Diffuse layer. Black color is completely opaque and white is completely transparent. A texture can be used to control the transparency of the diffuse layer.
Roughness – Simulate rough surfaces or surfaces covered with dust (for example: skin, or the surface of the Moon).
Use Irradiance Map – When enabled, the irradiance map will be used to approximate diffuse indirect illumination for the material. If this is disabled, brute force GI will be used. You can use this for objects in the scene which have small details and are not approximated very well by the irradiance map.
Use color texture as transparency – When enabled, V-Ray will use the direct alpha transparency of the texture on the materials.
Options
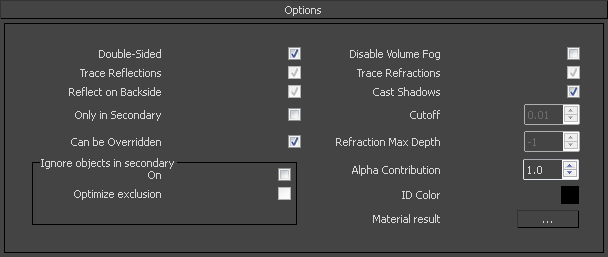
Double-sided – When enabled, V-Ray will flip the normal for back-facing surfaces with this material. Otherwise, the lighting on the "outer" side of the material will be computed always. You can use this to achieve a fake translucent effect for thin objects like paper.
Trace reflections – When disabled, reflections will not be traced, even if the reflection color is greater than black. You can turn this off to produce only highlights. Note that when this is off, the diffuse color will not be dimmed by the reflection color, as would happen normally.
Reflect on back side – When enabled, reflections will be computed for back-facing surfaces too. Note that this affects total internal reflections too (when refractions are computed).
Only in Secondary – When enabled, the material will only be visible in the reflection or refraction.
Can be Overridden – When enabled, the material will be overridden when you enable the override color option in the Global Switches.
Disable Volume Fog – When disabled, V-Ray will trace direct lighting into the material.
Trace refractions – When disabled, refractions will not traced.
Cast Shadows – When disabled, the material will not cast shadows.
Cutoff – The threshold below which reflections/refractions will not be traced. V-Ray tries to estimate the contribution of reflections/refractions to the image, and if it is below this threshold, these effects are not computed. Do not set this to 0.0 as it may cause excessively long render times in some cases.
Refraction Max depth – The number of times a ray can be refracted. Scenes with lots of refractive and reflective surfaces may require higher values to look right. -1 means that V-Ray will use the value specified on the “Max Depth” in the Global Switches.
Alpha Contribution – Allows you to obtain the alpha channel of each material in the scene. A value of 1 means no alpha and 0 means full alpha.
ID Color – Sets a unique color that will be visible when rendering using the ID Color VFB Channel.
Material result – This option is not utilized in the 3ds Max version of the V-Ray Material Editor.
Ignore objects in secondary
On – When enabled, the material will not be overridden when you enable the override color option in the Global Switches.
Optimized Exclusion – When enabled, the material will not be overridden when you enable the override color option in the Global Switches.
Maps
These determine the various texture maps that are used by the current material.
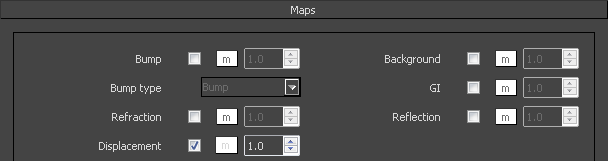
Bump – Allows you to use a texture map as bump map.
Bump type:
Bump – Same as the standard bump map in 3ds Max; the object's mapping coordinates are used.
Normal in tangent/object/camera/world space – Normal map is applied using the specified coordinate system.
Bump in local space – Bump map using the object's local XYZ coordinates. This option is suitable for objects that transform (e.g. move, rotate) but not suitable for objects that deform (e.g. bend, morph).
Explicit normals – Uses explicit normals set by the 3ds Max Edit Normals modifier to determine the orientation of the normal map.
Refraction – Allows you to override the refraction map of the environment settings for the current material.
Displacement – Allows you to use a texture map as a displacement map.
Background – Allows you to override the background map of the environment settings for this material.
GI – Allows you to override the GI map of the environment settings for this material.
Reflection – Allows the user to override the reflection map of the environment settings for the current material.
Reflection
General Reflection
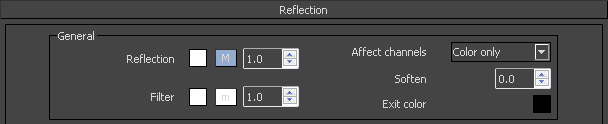
Reflection – The reflection color.
Filter – Used to tint the color of the reflection.
Affect Alpha – Allows you to specify which channels are going to be affected by the transparency of the material.
Color Channel Only – The transparency will affect only the RGB channel of the final render.
Color and alpha channel – Causes the material to transmit the alpha of the refracted objects, instead of displaying an opaque alpha.
All channels – All channels and render elements will be affected by the transparency of the material.
Soften – Allows you to soften the transition from dark to bright areas in specular reflections.
Exit color – If a ray has reached its maximum reflection depth, this color will be returned without tracing the ray further.
Reflection Glossiness

Highlight – Determines the shape of the highlight on the material. Normally this parameter is the same as the Reflect value in order to produce physically accurate results.
Reflect – Controls the sharpness of reflections. A value of 1.0 means perfect mirror-like reflection; lower values produce blurry reflections. Use the Subdivs parameter below to control the quality of glossy reflections.
Shader Type – Determines the type of BRDF (the shape of the highlight). This parameter has an effect only if the reflection color is different from black and the reflection glossiness is different from 1.0.
Phong – Phong highlight/reflections.
Blinn – Blinn highlight/reflections.
Ward – Ward highlight/reflections.
Treat glossy rays as GI rays – Specifies when and whether glossy rays will be treated as GI rays:
Never – Glossy rays are never treated as GI rays.
Only for GI rays – Glossy rays will be treated as GI rays only when GI is being evaluated. This can speed up rendering of scenes with glossy reflections and is the default.
Always – Glossy rays are always treated as GI rays. A side-effect is that the Secondary GI engine will be used for glossy rays. For example, if the primary engine is an irradiance map, and the secondary is light cache, the glossy rays will use the light cache (which is a lot faster).
Subdivs – Controls the quality of glossy reflections. Lower values will render faster, but the result will be more noisy. Higher values take longer, but produce smoother results.
Reflection Anisotropy

Anisotropy – Determines the shape of the highlight. A value of 0.0 means isotropic highlights. Negative and positive values simulate "brushed" surfaces.
Rotation – Determines the orientation of the anisotropic effect. Different brushed surfaces can be simulated by using a texture map for the anisotropy rotation parameter.
Local axis – Controls how the direction for the anisotropic effect is chosen:
X – The direction is based on the X axis.
Y – The direction is based on the Y axis.
Z – The direction is based on the Z axis.
Use Map channel – The direction is based on the selected mapping channel.
Refection Dim Distance
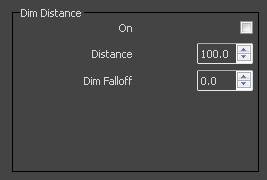
On – Enables dim distance.
Dim distance – Specifies a distance after which the reflection rays will not be traced.
Dim fall off – A fall-off radius for the dim distance.
Reflection Interpolation
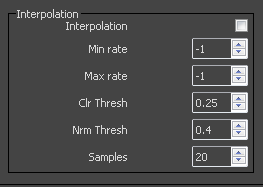
Interpolation – Turns caching on. V-Ray can use a caching scheme similar to the irradiance map to speed up rendering of blurry reflections. The options for the interpolation of blurry reflections are also very similar to the options for the irradiance map. Note that it is not recommended to use interpolation for animations, since this may cause severe flickering.
Min rate – Determines the resolution for the first interpolation pass. A value of 0 means the resolution will be the same as the resolution of the final rendered image, which will make the interpolation similar to the direct computation method. A value of -1 means the resolution will be half that of the final image and so on.
Max rate – Determines the resolution of the last interpolation pass.
Color threshold (Clr thresh) – Controls how sensitive the interpolation algorithm is to changes in the color of reflections. Larger values mean less sensitivity and smaller values mean more sensitivity and better results.
Normal threshold (Nrm thresh) – Controls how sensitive the algorithm is to changes in surface normals and small surface details. Larger values mean less sensitivity; smaller values mean more sensitivity to surface curvature and small details.
Samples – The number of samples that will be used to interpolate the blurry reflections at a given point. Larger values tend to blur the detail, although the result will be smoother. Smaller values produce results with more detail, but may produce blotchiness if the Subdivs parameter has been set too low.
Refraction

Color – Refraction color. Note: The actual refraction color depends on the reflection color as well.
Transparency – Controls the transparency of the Refraction layer. Black color is completely opaque and white is completely transparent. A texture can be used to control the transparency of the refraction layer.
Glossiness – Controls the sharpness of refractions. A value of 1.0 means perfect glass-like refraction; lower values produce blurry refractions. Use the Subdivs parameter below to control the quality of blurry refractions.
IOR – Index of Refraction for the material, which describes the way light bends when crossing the material surface. A value of 1.0 means the light will not change direction.
Subdivs – Controls the quality of blurry refractions. Lower values will render faster, but the result will be more noisy. Higher values take longer, but produce smoother results. This parameter also controls the quality of the translucent effect, if on (see below).
Refraction Options

Affect shadows – Causes the material to cast transparent shadows depending on the refraction color and the fog color. This only works with V-Ray shadows and lights.
Affect alpha – Causes the material to transmit the alpha of the refracted objects, instead of displaying an opaque alpha. Note that currently this works only with clear (non-blurry) refractions.
Enable Exit color – Activates the exit color options.
Refract Exit color – When enabled, and a ray has reached the maximum refraction depth, the ray will be terminated and the exit color returned. When disabled, the ray will not be refracted, but will be continued without changes.
Reflect Exit color – When enabled, and a ray has reached the maximum reflection depth, the ray will be terminated and the exit color returned. When disabled, the ray will not be reflected, but will be continued without changes.
Refraction Fog
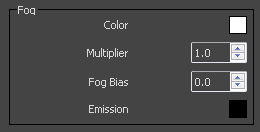
Color – The attenuation of light as it passes through the material. This option allows us to simulate the fact that thick objects look less transparent than thin objects. Note: The effect of the fog color depends on the absolute size of the objects and is therefore scene-dependent.
Multiplier – The strength of the fog effect. Smaller values reduce the effect of the fog, making the material more transparent. Larger values increase the fog effect, making the material more opaque. In more precise terms, this is the inverse of the distance at which a ray inside the object is attenuated with an amount equal to the fog Color.
Fog Bias – Changes the way the fog color is applied. Negative values make the thin parts of the objects more transparent and the thicker parts more opaque and vice-versa (positive numbers make thinner parts more opaque and thicker parts more transparent).
Emission – Controls the fog color light emission (self-illumination).
Refraction Dispersion
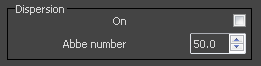
On – Enables the calculation of true light wavelength dispersion.
Abbe number – Allows you to increase or decrease the dispersion effect. Lowering it widens the dispersion and vice versa.
Refraction Translucency
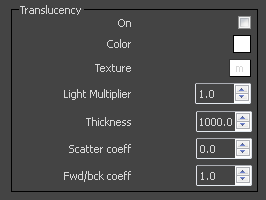
On – Activates the translucency (also called sub-surface scattering). Currently only single-bounce scattering is supported.
Color – Normally the color of the sub-surface scattering effect depends on the fog Color; this parameter allows you to additionally tint the SSS effect.
Texture – Normally, the color of the sub-surface scattering effect depends on the fog Color; this parameter allows you to additionally tint the SSS effect with a texture.
Light multiplier – A multiplier for the translucent effect.
Thickness – Limits the distance for which rays will be traced below the surface. This is useful if you do not want to or don't need to trace the whole sub-surface volume.
Scatter coefficient – The amount of scattering inside the object. 0.0 means rays will be scattered in all directions; 1.0 means a ray cannot change its direction inside the sub-surface volume.
Forward/backward coefficient – Controls the direction of scattering for a ray. 0.0 means a ray can only go forward (away from the surface, inside the object); 0.5 means that a ray has an equal chance of going forward or backward; 1.0 means a ray will be scattered backward (towards the surface, to the outside of the object).
Refraction Interpolation

Interpolation – Turns caching on. V-Ray can use a caching scheme similar to the irradiance map to speed up rendering of blurry refractions. The options for the interpolation of blurry refractions are also very similar to the options for the irradiance map. Note that it is not recommended to use interpolation for animations, since this may cause severe flickering.
Min rate – Determines the resolution for the first interpolation pass. A value of 0 means the resolution will be the same as the resolution of the final rendered image, which will make the interpolation similar to the direct computation method. A value of -1 means the resolution will be half that of the final image and so on.
Max rate – Determines the resolution of the last interpolation pass.
Color threshold (Clr thresh) – Controls how sensitive the interpolation algorithm is to changes in the color of refractions. Larger values mean less sensitivity and smaller values mean more sensitivity and better results.
Normal threshold (Nrm thresh) – Controls how sensitive the algorithm is to changes in surface normals and small surface details. Larger values mean less sensitivity; smaller values mean more sensitivity to surface curvature and small details.
Samples – The number of samples that will be used to interpolate the blurry refractions at a given point. Larger values tend to blur the detail, although the result will be smoother. Smaller values produce results with more detail, but may produce blotchiness if the Subdivs parameter has been set too low.
Emissive
The emissive layer allows the user to add self illumination to the material.
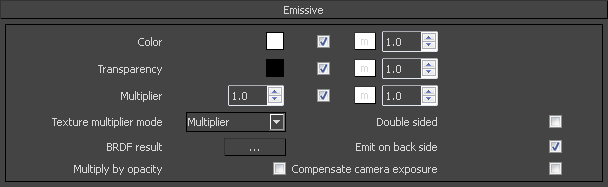
Color – The color of the emissive component.
Transparency – Controls the transparency of the Emissive layer. Black color is completely opaque and white is completely transparent. A texture can be used to control the transparency of the diffuse layer.
Multiplier – A multiplier for the intensity of the emission
Texture multiplier mode – Chose the mode in which the color of the light material will be specified.
BDRF result – This option is not utilized in the 3ds Max version of the V-Ray Material Editor.
Multiply by opacity – When enabled, the color of the light material is multiplied by the opacity texture. Otherwise, the color and opacity act independently (so-called additive transparency).
Double sided – When enabled, the object will emit light from the front faces, and appear black on the back side of the faces.
Emit on back side – When enabled, makes the object emit light from its back side as well. If enabled and Double Sided is disabled, the material is rendered as black on the back sides.
Compensate camera exposure – When enabled, the intensity of the light material will be adjusted to compensate the exposure correction from the VRayPhysicalCamera.
Displacement
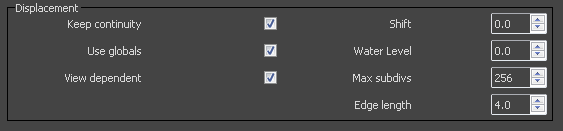
Keep Continuity – Tries to produce a connected surface, without splits.
Use Globals – When disabled, V-Ray will use the material displacement parameters. If this is enabled, V-Ray will use the Default displacement parameters.
View Dependent – When enabled, Edge length determines the maximum length of a subtriangle edge, in pixels. A value of 1.0 means that the longest edge of each subtriangle will be about one pixel long when projected on the screen. When View–dependent is off, Edge length is the maximum subtriangle edge length in world units.
Shift – Specifies a constant, which will be added to the displacement map values, effectively shifting the displaced surface up and down along the normals. This can be either positive or negative.
Water Level – Clips the surface geometry in places where the displacement map value is below the specified threshold. This can be used for clip mapping a displacement map value below which geometry will be clipped.
Max Subdivs – Controls the maximum subtriangles generated from any triangle of the original mesh. The value is in fact the square root of the maximum number of subtriangles. For example, a value of 256 means that at most 256 x 256 = 65536 subtriangles will be generated for any given original triangle. It is not a good idea to keep this value very high. If you need to use higher values, it will be better to subdivide the original mesh itself into smaller triangles instead. The actual subdivisions for a triangle are rounded up to the nearest power of two (this makes it easier to avoid gaps because of different tessellation on neighboring triangles).
Edge Length – Determines the quality of the displacement. Each triangle of the original mesh is subdivided into a number of subtriangles. More subtriangles mean more detail in the displacement, slower rendering times and more RAM usage. Less subtriangles mean less detail, faster rendering and less RAM. The meaning of Edge length depends on the View-dependent parameter.
Angle Blend
The VRay Angle Blend material allows you to make a blend between two materials. The angle of blend depend of the view direction and the surface normal. V-Ray can use several blend functions to determine the blended result. It can be used to create complex materials like car paints, velvet, pearl, etc.

Mtl One – The material which is used on the perpendicular area to the view direction
Mtl Two – The material which is used on the parallel area to the view direction.
Start Angle – The angle in which the blend of the material will start.
Stop Angle – The angle in which the blend of the material will stop.
Blend Function – Allows you to choose a specific function for V-Ray to calculate the blended result. For more information, please see Blend Function Diagrams below.
Linear – Straight linear progression from material 1 to material 2.
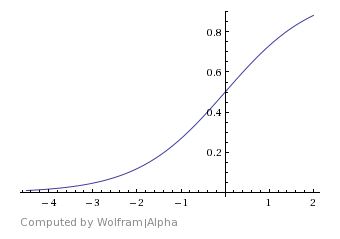
Normal Distribution – Starts approximately evenly blended between material 1 and 2 and then gradually transitions to material 2.
Sigmoid – Aslow curve that eases out of material 1 with the Start Angle before smoothing out in the middle, and then easing into material 2 at the end with the Stop Angle.
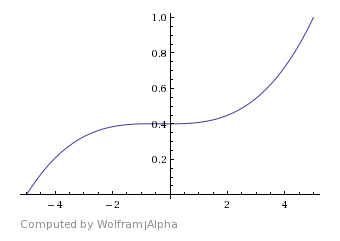
Gompertz – Similar to Sigmoid, but slightly faster at reaching a point where the materials are blended.
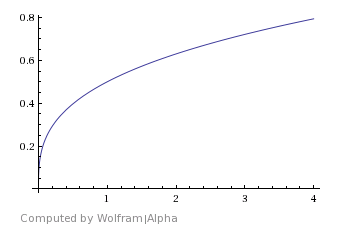
Cube Root – A smooth curve blending from material 1 to material 2 that rapidly jumps around the middle of Start and Stop angles and then returns to a smooth curve.
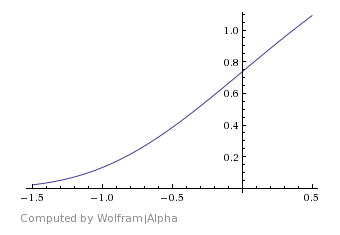
Cubic – Rapid progression from material 1 to material 2 that slows down briefly around the middle of Start and Stop angles before resuming fast progression toward material 2.
Cubic Polynominal – A smoother cubic shape with a longer hold in the center of the blend than Cubic.
Flip view direction – Changes the direction of the blend.
Blend Function Diagrams
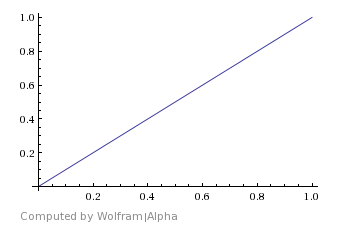
Linear
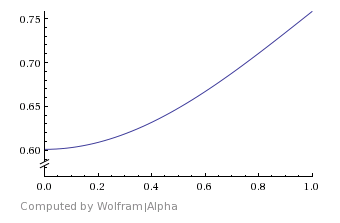
Normal Distribution
Sigmoid
Gompertz
 Cube Root

Cubic
Cubic Polynominal
Two Sided
The material allows the potential for seeing the light on the backside of the objects. Use this material to simulate thin translucent surfaces like paper, cloth curtains, tree leaves, etc.

Front – The material used for front-side faces as defined by the object normals.
Back – The material used for back side faces as defined by their normals.
Color – Determines which side (front or back) relative to the camera is more visible in the rendering process. By default, this color is black (0.0), which means that only the front side will be visible. When this color is closer to white (1.0) more of the back material is going to be seen. When it is closer to black (0.0), more of the material facing the camera is going be seen.
Force One-Sided – When enabled, the sub-materials will render as one-sided materials. Turning this option off is not recommended.
Material result – This option is not utilized in the 3ds Max version of the V-Ray Material Editor.
Skp Two Sided
The material allows you to have a separate material for the front and back faces. It can be very useful when creating very quick conceptual renders when trying to convey ideas with minimal modeling.

Front material – The material used for front-side faces as defined by the object normals.
Back material – The material used for back side faces as defined by their normals.
Force One-Sided – When enabled, the sub-materials will render as one-sided materials. Turning this option off is not recommended.
Toon Material
The toon material is a very simple material that produces cartoon-style outlines on objects in the scene. Note: It is not intended to be a full NPR (non-photorealistic rendering) effect. However, it may be useful in many cases.
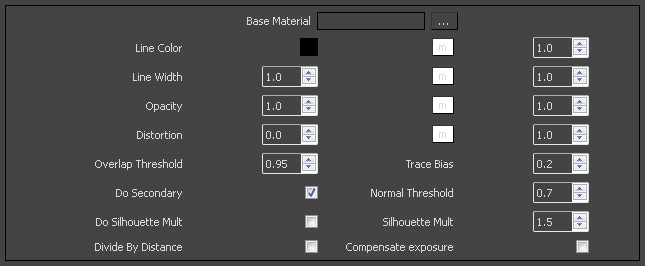
Base Material – Specifies the base material on top of which the toon effect will be applied
Line color – The color of the outlines.
Line width – The width of the outlines in world units.
Opacity – Determines the opacity of the outlines.
Distortion – Distorts the outlines. A texture can be used to distort the outlines. This works similar to bump-mapping and will take the gradient of the texture as direction for distortion. Note that high output values may be required for larger distortion.
Overlap threshold – Determines when outlines will be created for overlapping parts of one and the same object. Lower values will reduce the internal overlapping lines, while higher values will produce more overlapping lines. Don't set this value to 1.0 as this will fill curved objects completely.
Trace bias – Depending on the scale of your scene, this determines the ray bias when the outlines are traced in reflections/refractions.
Do secondary – Causes the outlines to appear in reflections/refractions as well. Note that this may increase render times.
Normal threshold – Determines when lines will be created for parts of the same object with varying surface normals (for example, at the inside edges of a box). A value of 0.0 means that only 90 degrees or smaller angles will generate internal lines. Higher values mean that smoother normals can also generate an edge. Don't set this value to 1.0 as this will fill curved objects completely.
Do Silhouette Mult – Activates the Silhouette Multiplier.
Silhouette Mult – Multiplies the silhouette effect.
Divide By Distance – When enabled, the toon lines on objects that are closer to the camera will be thicker. Toon lines will be thinner the farther away the objects are from the camera.
Compensate Exposure – When enabled, the VRayToon will compensate the Line Color brightness to adjust for any Exposure correction from a VRayPhysicalCamera.