User Interface
This page gives an overview of V-Ray's UI integration into 3ds Max.
Overview
V-Ray is a rendering plug-in for 3ds Max. It includes two renderers:
-
V-Ray, the original full-featured, robust renderer for photorealism and special effects, which utilizes all V-Ray's features. For more specifics on V-Ray, see V-Ray in 3ds Max.
-
V-Ray GPU is a separate render engine introduced by Chaos Group. It utilizes GPU devices and also provides a Hybrid Rendering (both CPU and GPU) option. V-Ray GPU renders most V-Ray and 3ds Max features, but not all. For more specifics on V-Ray GPU, see V-Ray GPU in 3ds Max.
As of V-Ray Next, V-Ray and V-Ray GPU work only in Production Rendering Mode . Both renderers can still be used interactively in IPR mode.
V-Ray integrates with the 3ds Max user interface in a variety of areas. Menu options, dialog windows, and parameters flow logically from your familiar 3ds Max tools to make using V-Ray a seamless experience.
V-Ray or V-Ray GPU needs to be assigned as your renderer in the 3ds Max Render Setup window in order to get full use of these options.
Menus
V-Ray adds a number of items to the 3ds Max menus, they are added in particular, to the Tools, Create, Modifiers, and Rendering menus. For more information, see Menu Integration.
V-Ray Toolbar
V-Ray comes with toolbar that includes shortcuts to some of the most commonly used V-Ray components. By default the toolbar is docked vertically to the left of the 3ds Max window but it can be easily pulled from its left side docked position to a horizontal toolbar by pulling at the top end of the toolbar. For more information, see V-Ray Toolbar.
If the V-Ray Toolbar is not visible, check to make sure floating toolbars are set to display in 3ds Max by going to Customize menu > Show UI > Show Floating Toolbars.
Tool Windows
V-Ray Frame Buffer
V-Ray allows you as well as rendering to the 3ds Max Rendered Frame Window (RFW or VFB), to render to a V-Ray specific frame buffer, which has some additional capabilities. Including allowing viewing of all render elements in a single window; keeps the image in full 32 bit floating point format; allows simple color corrections on the rendered image; allows you to choose the order in which the buckets are rendered; can store a list of recently rendered images and allow switch between them easily and also allows the application of lens effects to the rendered image. For more information, see V-Ray Frame Buffer.
V-Ray Light Lister
The V-Ray Light Lister window is a handy way that allows you to modify many common attributes of all of the lights in the scene, both V-Ray lights and standard 3ds Max lights in one UI. In scenes with complex lighting using many lights this can make changing attributes far simpler. For more information, see V-Ray Light Lister.
V-Ray Quick Settings
The V-Ray Quick Settings dialog allows the control of some of the most common aspects of the renderer. It is a handy way to quickly switch between different GI solutions and quality settings. It gives the ability to set up working settings for a scene without having to consider all the V-Ray options available in the Render Setup dialog. For more information, see V-Ray Quick Settings.
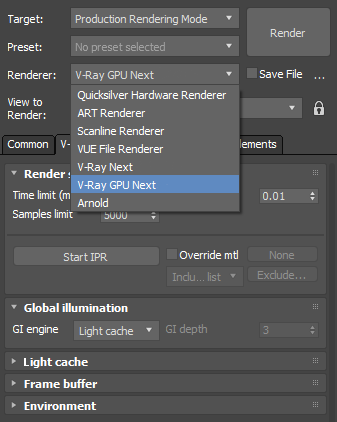
Selecting a Renderer
To use V-Ray or V-Ray GPU, you must first select one the renderers as your Production renderer.
-
Open the Render Setup window.
-
At the top of the Render Setup window, choose Production Rendering Mode as the Target.
-
For Renderer, choose V-Ray or V-Ray GPU.
V-Ray Next and V-Ray GPU Next are not available renderer options for ActiveShade in 3ds max. Scenes saved with older versions of V-Ray with ActiveShade mode can still be opened in V-Ray Next in order to convert them to Production Rendering Mode.