GPU Global Switches
This page provides information on the Global Switches rollout under the V-Ray GPU Settings tab.
Overview
The Global Switches rollout controls some overrides and global settings.
UI Path
||Render Setup window|| > Settings tab > Global switches rollout
Parameters
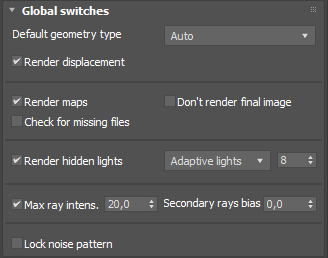
Default geometry type – Determines the type of geometry for standard 3Ds Max mesh objects. Some objects, such as displacement-mapped objects and VRayProxy, always generate dynamic geometry, regardless of this setting.
Static – All geometry is pre-compiled into an acceleration structure at the beginning of the rendering and remains there until the end of the frame. The static raycasters are not limited in any way and consumes as much memory as necessary.
Dynamic – Geometry is loaded and unloaded on the fly depending on which part of the scene is being rendered.
Auto – Some objects are compiled as static geometry, while others are dynamic. V-Ray makes the decision on which type to use based on the face count for an object and the number of its instances in the scene.
Render displacement – Globally enables or disables V-Ray's own displacement mapping.
Render maps – Globally enables or disables texture maps.
Don't render final image – When this option is enabled, V-Ray only calculates the relevant global illumination maps (Light Cache). This is a useful option if you are calculating maps for a fly-through animation.
Check for missing files – When enabled, V-Ray tries to find any missing files in the scene and puts up a dialogue listing them, if there are any. The missing files are also printed to the VRayLog.txt file. If the scene is rendered with distributed rendering and if a render server detects missing files, the scene is not rendered. This can be used as a way to prevent wrong buckets from machines that cannot read texture files, etc.
Render hidden lights – Enables the usage of hidden lights.
Light evaluation – Determines how lights are sampled in scenes with many lights.
Adaptive lights – V-Ray chooses only a specified number of lights to evaluate based on what light sources are most likely to affect a shaded point. In V-Ray GPU, the Adaptive lights algorithm works with both Light Cache or Brute Force as the secondary GI engine. Adaptive lights can be very helpful when rendering scenes with many lights and help achieve a clean result.
Full lights evaluation – V-Ray goes through each scene light and evaluates it at each shading point. In scenes with many lights and lots of GI bounces, this leads to a lot of shadow rays being traced and rendering can become extremely slow.
Light Tree 1 – V-Ray selects a variable number of suitable finite light sources based on proximity and evaluates only those. This mode may speed up the Light Cache and Brute Force calculations for scenes with lots of lights. It can also reduce flickering due to missed light sources.
Max ray intens. – Suppresses the contribution of very bright rays, which may typically cause excessive noise (fireflies) in the rendered image. Its effect is similar to the combination of Subpixel mapping and Clamp output options of the Color mapping section, but the Max ray intensity is applied to all secondary (GI/reflection/refraction) rays, as opposed to the final image samples. This allows fireflies to be effectively suppressed but without losing too much HDR information in the final image. Similar to the Subpixel mapping option, the Max ray intensity introduces bias in the rendered image, as it may turn out to be darker than the actual correct result.
Secondary rays bias – A small positive offset that is applied to all secondary rays; this can be used if you have overlapping faces in the scene to avoid the black splotches that may appear. This parameter is also useful when using the 3ds Max Render-to-texture feature. For more information, see The Secondary Rays Bias example.
Lock noise pattern – When enabled, the sampling pattern is the same from frame to frame in animation. Since this may be undesirable in some cases, keep this option disabled to make the sampling pattern change with time. Note that re-rendering the same frame produces the same result in both cases.
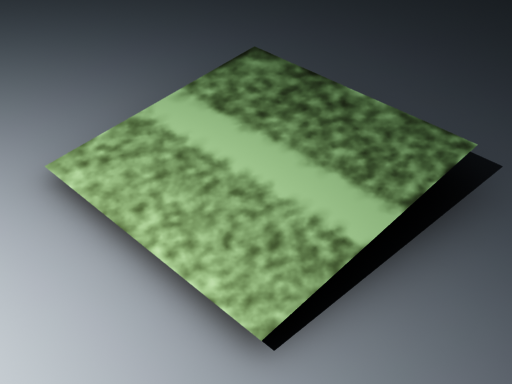
Example: Secondary Rays Bias
This example shows the effect of the Secondary rays bias parameter. The scene below has a box object with a height of 0.0, which the top and bottom of the box occupy exactly the same region in space. Due to this, V-Ray cannot resolve unambiguously intersections of rays with these surfaces.
The first image shows what happens when you try to render the scene with the default settings. You can see the splotches in the GI solution, caused by the fact that rays randomly intersect one or the other surface:
In the second image below, the Secondary rays bias is set to 0.001, which offsets the start of each ray a little bit along its direction. In effect, this makes V-Ray skip the problematic surface overlaps and render the scene correctly :
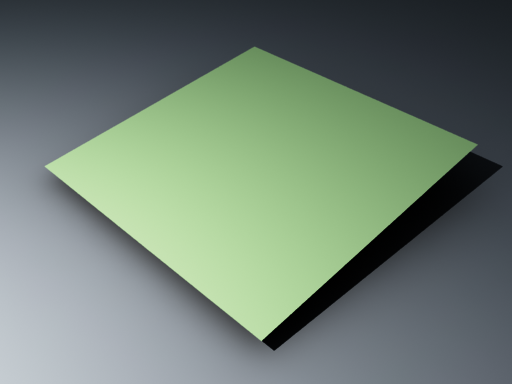
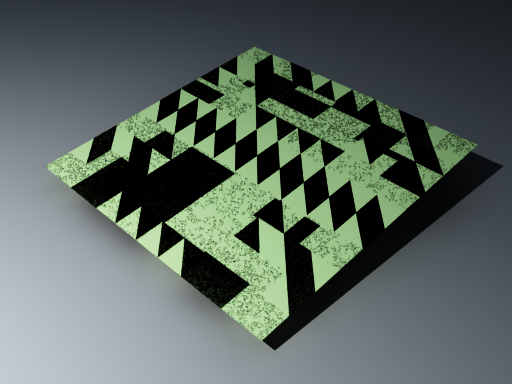
Note that the Secondary rays bias affects only things like GI, reflections, etc. In order to render the scene properly, the material assigned to the box has its 2-sided option checked. This is so that the object looks in the same way regardless of whether the camera rays hit the top or the bottom of the box. If the material did not have this option checked, it would appear "noisy" even though the Secondary rays bias is greater than 0.0:
Footnotes
-
Since V-Ray Next, Update 2 the Uniform Probabilistic Lights evaluation method is replaced with the enhanced Light Tree evaluation method.