Global Switches
This page provides information on the Global switches rollout under the V-Ray tab in the Render Setup window.
Overview
The global switches control various aspects of the renderer globally.
UI Path
||Render Setup window|| > V-Ray tab > Global switches rollout
Default Parameters
The following parameters are visible from the Global Switches rollout when set to the Default Render UI Mode.
Displacement – Enables (default) or disables V-Ray's own displacement mapping. Note that this has no effect on standard 3ds Max displacement mapping, which can be controlled via the corresponding parameter in the Render Scene dialog.
Lights – Enables or disables lights globally. Note that if you disable this option, V-Ray uses default lights, unless Default lights is set to Off.
Hidden lights – Enables or disables the usage of hidden lights. When this option is enabled, lights are rendered regardless of whether they are hidden or not. When this option is disabled, any lights that are hidden for any reason (either explicitly or by type) are not included in the rendering.
Don't render final image – When this option is enabled, V-Ray only calculates the relevant global illumination maps (photon maps, light maps, irradiance maps). This is a useful option if you are calculating maps for a fly-through animation.
Override depth – Global limit to reflection/refraction depth. When this option is disabled, the depth is controlled locally by materials and maps. When this option is enabled, all materials and maps use the specified depth.
Override mtl – Overrides the scene materials when rendering. All objects are rendered with the chosen material if one is selected, or with their default wireframe materials if no material is specified.
Max transp. levels – The depth to which transparent objects are traced.
Override exclude – Displays the 3ds Max Include/Exclude dialog for selection of objects to be rendered with the override material.
Advanced Parameters
The following parameters are added to the list of visible settings available from the Global Switches rollout when set to the Advanced Render UI Mode.
Force back face culling – Enables or disables (default) back face culling for camera and shadow rays. When this option is enabled, the surfaces of objects which are turned away from the camera (or the light source, when tracing shadows) appear fully transparent. This enables a camera outside a closed object to see inside it.
Note: This option does not function when the Use Embree option is enabled in the System rollout. To force back face culling, Use Embree should be disabled and set the following environment variable: VRAY_USE_SINGLE_RAY=1.
Shadows – Enables or disables shadows globally.
Default lights – Controls the default lights in the scene.
Off – Default lights in the scene are always switched off.
On – Default lights are always switched on when there are no lights in the scene or the Lights option is disabled.
Off with GI – Default lights are switched off only when Global Illumination is enabled or there are lights in the scene.
Light evaluation – Determines how lights are sampled in scenes with many lights. For more information, see The Adaptive Lights example below.
Adaptive lights – Uses information from the Light cache to determine which lights to sample. If a Light cache is not used, light tree sampling is used. Depending on the scene, it can be faster than the Full lights evaluation mode.
Full lights evaluation – V-Ray goes through each scene light and evaluates it at each shading point. In scenes with many lights and lots of GI bounces, this leads to a lot of shadow rays being traced and rendering can become extremely slow.
Light tree 1 – V-Ray selects a variable number of suitable finite light sources based on proximity and evaluates only those. This mode may speed up the Light Cache and Brute Force calculations for scenes with lots of lights. It can also reduce flickering due to missed light sources.
Number of lights – Number of lights from the scene that are evaluated by V-Ray when the Light evaluation parameter is set to Adaptive. To achieve a positive effect from adaptive light sampling, this value must be lower than the actual number of lights in the scene. Lower values make the rendering go faster, but the result is potentially more noisy. Higher values cause more lights to be computed at each hit point, thus producing less noise but increased render times.
Reflection/refraction – Enables or disables the calculation of reflections and refractions in V-Ray maps and materials.
Maps – Enables or disables texture maps.
Glossy effects – When enabled (the default), glossy reflections are visible in the render. When disabled, all material glossiness settings are ignored, and both reflections and refractions render sharp. This option is useful for test renderings.
Transp. cutoff – Controls when tracing of transparent objects is stopped. If the accumulated transparency of a ray is below this threshold, no further tracing is performed.
Max ray intensity – Suppresses the contribution of very bright rays, which may typically cause excessive noise (fireflies) in the rendered image. Its effect is similar to the Subpixel mapping + Clamp output options of the Color mapping section, but the Max ray intensity is applied to all secondary (GI/reflection/refraction) rays, as opposed to the final image samples. This allows fireflies to be effectively suppressed but without losing too much HDR information in the final image. Similar to the Subpixel mapping option, the Max ray intensity introduces bias in the rendered image, as it may turn out to be darker than the actual correct result.
This parameter is turned off when loading scenes saved with V-Ray 2.x in order to produce the same results.
The subpixel color mapping option is incompatible with the adaptive lights and can lead to blocky artifacts due to the different sampling rate of the light sources in different cells of the light grid.
Secondary rays bias – A small positive offset that is applied to all secondary rays. This can be used if you have overlapping faces in the scene to avoid the black splotches that may appear. This parameter is also useful when using the 3ds Max Render-to-texture feature. For more information, see The Secondary Rays Bias example below.
Example: Adaptive Lights
Below is an example rendering of a scene with the default Progressive Image Sampler settings, using Brute Force/Light Cache GI engines. Only the Noise Threshold parameter was set to 0.002. Notice how the render time is reduced significantly in favor of the Adaptive Lights in comparison to Full Evaluation.

Adaptive Lights; render time 39 mins

Light Tree; render time 48 mins
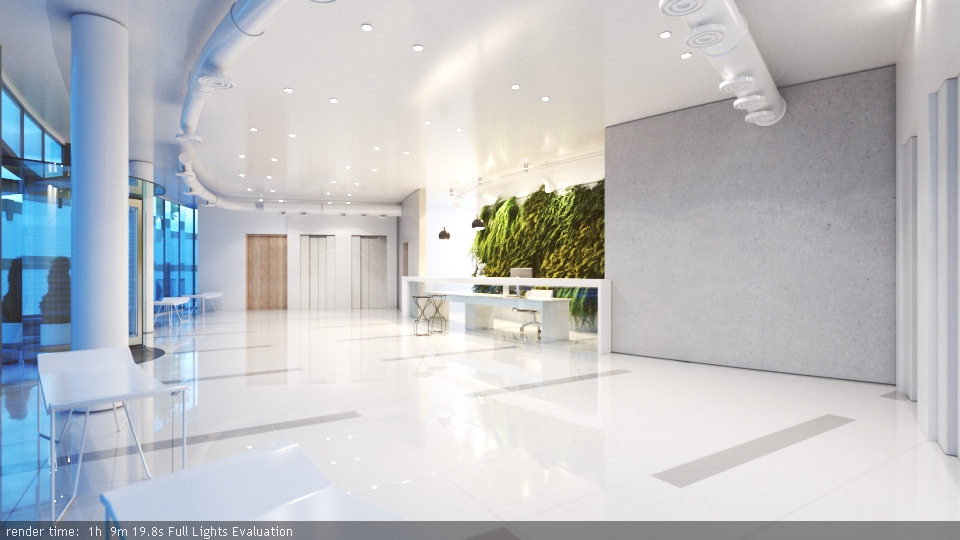
Full Lights Evaluation; render time 1h 9 mins
Example: Secondary Rays Bias
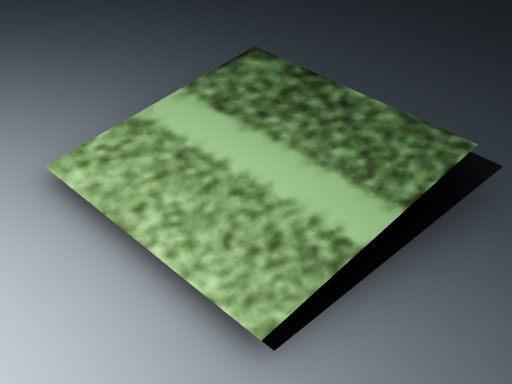
This example shows the effect of the Secondary rays bias parameter. The scene below has a box object with a height of 0.0, which the top and bottom of the box occupy exactly the same region in space. Due to this, V-Ray cannot resolve unambiguously intersections of rays with these surfaces.
The first image shows what happens when you try to render the scene with the default settings. You can see the splotches in the GI solution, caused by the fact that rays randomly intersect one or the other surface:
In the second image below, the Secondary rays bias is set to 0.001, which offsets the start of each ray a little bit along its direction. In effect, this makes V-Ray skip the problematic surface overlaps and render the scene correctly :
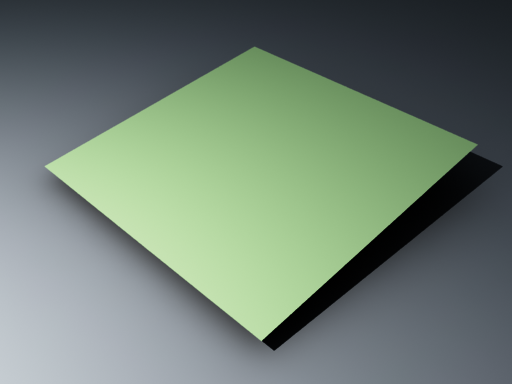
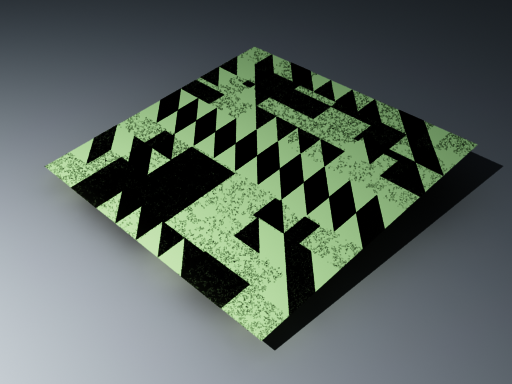
Note that the Secondary rays bias affects only things like GI, reflections, etc. In order to render the scene properly, the material assigned to the box has its 2-sided option checked. This is so that the object looks in the same way regardless of whether the camera rays hit the top or the bottom of the box. If the material did not have this option checked, it would appear "noisy" even though the Secondary rays bias is greater than 0.0:
Expert Parameters
The following parameters are added to the list of visible settings available from the Global Switches rollout when set to the Expert Render UI Mode.
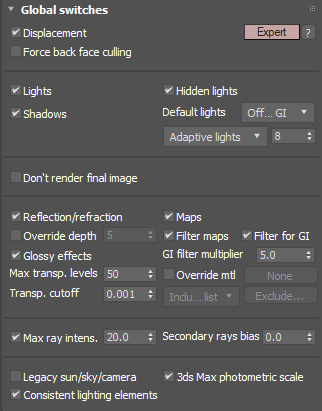
Filter maps – Enables or disables texture map filtering. When enabled, the depth is controlled locally by texture map settings. When disabled, no filtering is performed.
Filter maps for GI – Enables or disables texture filtering during calculations of GI and glossy reflections/refractions. When disabled, texture maps are not filtered for GI and glossy reflections/refractions in order to speed up the calculations. When this option is enabled (the default), textures are filtered in these cases.
GI filter multiplier – A multiplier for texture filtering for GI.
Legacy sun/sky/camera – When disabled (the default), V-Ray uses improved and more accurate models. If turned on, V-Ray switches to the old models for compatibility with older scenes.
3ds Max photometric scale – When enabled (the default), it aligns the VRayLight, VRaySun, VRaySky, and VRayPhysicalCamera to the photometric units used by 3ds Max and its photometric lights.
Consistent lighting elements – When enabled, this option provides more accurate, artifact-free lighting render elements not dependant on light sampling. It also provides better support for Adaptive dome light. Please note, that this option is applicable to raw lighting render elements only when the corresponding normal and filter render elements are available (e.g., VRayRawGlobalIllumination = VRayGlobalIllumination / DiffuseFilter ).
Since V-Ray Next Update 1, some of the render elements are rendered differently than before. The Lighting render element now contains all direct diffuse illumination and the GI element contains all indirect diffuse illumination. Similarly, all direct reflections of lights now go to the Specular element and all indirect reflections go to the Reflection element.
Previously this behavior depended on the sampling of the lights and not just on the type of the contribution. Some of the direct contributions that should be in the Lighting and Specular elements were written to the GI and Reflection elements instead. In both cases they compose back to Beauty correctly but the different types of contributions are now split between the elements more consistently.
This change makes the elements more consistent but it's also needed for preventing artifacts in these elements with the adaptive dome light (and possibly in the future with other adaptive lights).
The raw elements are affected only when the corresponding normal and filter elements are available, otherwise they're rendered as before. This is because the raw elements have to be derived internally from the corresponding normal elements in order to work with the consistent elements (f.e. VRayRawGlobalIllumination = VRayGlobalIllumination / DiffuseFilter).
There's an option to enable or disable the new behavior in the Consistent rollout under the V-Ray tab in the Render Setup window. The consistent elements are automatically enabled when the scene contains an adaptive dome light so they don't have artifacts. They are also enabled by default for new scenes. For V-Ray GPU they are always enabled without an option to disable them.
Footnotes
-
Since V-Ray Next, Update 2 the Uniform Probabilistic Lights evaluation method is replaced with the enhanced Light Tree evaluation method.