V-Ray Frame Buffer
This page provides information on the V-Ray Frame Buffer and its features.
Overview
The V-Ray Frame Buffer is a display window for V-Ray renderings that includes a number of V-Ray-specific features. While V-Ray can render to the 3ds Max Rendered Frame Window (RFW or VFB), the V-Ray Frame Buffer has some additional capabilities:
-
Switches between render elements via a dropdown of all render elements
-
Keeps the image in full 32-bit floating point format
-
Performs Color Corrections on the rendered image
-
Allows you to choose the order in which the buckets are rendered
-
Can store a list of recently rendered images and switch between them or compare them
-
Applies simple Lens Effects to the rendered image
-
Automatically adjusts render resolution when the VFB window is resized with V-Ray GPU and V-Ray IPR
-
The ability to load progressive resumable files (.vrprog ) and the V-Ray .vrimg file format.
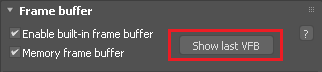
To use the V-Ray Frame Buffer for rendering, turn on the Enable built-in frame buffer option in the Frame buffer rollout under the V-Ray tab in the Render Setup window.
The V-Ray VFB can also be controlled with environment variables or MAXScript. See Controlling the VFB Programmatically for details.
The V-Ray VFB also has some limitations which are listed in the Notes section below.
UI Paths
||V-Ray Toolbar|| > Last VFB button

||Render Setup window|| > V-Ray tab > Frame buffer rollout > Show last VFB button
VFB Toolbar
|
|
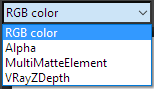
This dropdown gives access to render elements rendered for the scene. The selected render element is displayed in the VFB. By default, the RGB color and Alpha render elements are available. Any additional render elements that have been added to the scene will also appear in the drop-down. |
|
|
This part of the toolbar sets the currently selected channel, as well as the preview mode. Choose which channels to see with the help of the buttons. You can also view the rendered image in monochromatic mode. |

 The RGB Button switches the current channel to RGB color by default. When effects are applied, such as the
 |
|
Save current channel – Saves the current channel to an image file format. |
|
|
Save all image channels to separate files – Saves all the render elements into separate files. (available from flyout) |
|
|
Save all image channels to single file – Saves the image into a single file. If a multi-channel type file is used (.exr, .vrimg) all the render elements will be saved in the same file. (available from flyout) |
|
|
Opens an image file to be previewed in the V-Ray Frame Buffer. |
|
|
Copies the current channel to the clipboard. |
|
|
Clears the contents of the frame buffer. Sometimes helpful when starting a new render to prevent confusion with the previous image. |
|
|
Creates a 3ds Max virtual frame buffer copy of the current V-Ray frame buffer. You can turn this on and of on-the-fly while rendering. |
|
|
Forces V-Ray to render the closest bucket found to the mouse pointer. Drag the mouse over the V-Ray frame buffer while rendering to see which buckets are rendered first. You can turn this on and off on-the-fly while rendering. |
|
|
Allows you to render regions in the V-Ray VFB. See the Render Region section for more information. |
|
|
Links the V-Ray VFB to Pdplayer. |
|
|
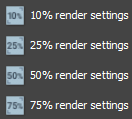
1Left click enables/disables the test resolution in the VFB. Right-click to bring up menu to select the percentage of the render resolution to set as the test resolution.
|
|
|
Renders only the selected object(s), while the rest of the scene is rendered black. You can also select materials/textures nodes and all of the objects with the shader are isolated. |
|
|
Renders only the locked object for shading |
|
|
Renders only the light contribution in the scene. |
|
|
Shows only the ambient occlusion in the scene. |
|
|
Shows the rendered objects in wireframe. |
|
|
Shows the normals of the rendered objects. |
|
|
Displays the UV coordinates of the rendered objects in color grade. |
|
|
Displays the Barycentric coordinates of the rendered objects. |
|
|
Starts IPR. |
|
|
Refreshes interactive rendering. |
|
|
Stops the current rendering. |
|
|
Repeat the last render. |
|
|
Opens the Color Corrections window which lets you define color corrections of various color channels. Right-click to dock or undock it. |
|
|
Forces color clamping in the V-Ray VFB. Click and hold left mouse button to display the clamped colors in the V-Ray VFB. |
|
|
Permanently opens the info window which will give you information about the pixel you right-click the mouse pointer on. If you right-click the mouse pointer over a pixel without turning this setting on you will see the info dialog only while your mouse button is down. |
|
|
Enables the White balance color correction. |
|
|
Enables the Hue/Saturation/Lightness color corrections. |
|
|
Enables the color balance color corrections. |
|
|
Enables the levels color corrections. |
|
|
Enables the curve color corrections. |
|
|
Enables the exposure corrections. |
|
|
Enables the usage of a background image. |
|
|
Displays the image in sRGB color space. Click and hold the left mouse button to switch between sRGB color space and ICC. |
|
|
Enables and disables the effect of the Look Up table loaded in the Color Corrections settings. Hold down to chose between LUT and OCIO color corrections. |
|
|
Shows the V-Ray VFB history window. Right-click to dock or undock it. |
|
|
Enables visualization the pixel aspect ratio. |
|
|
Enables or disables stereoscopic preview. Click and hold down the left mouse button to pick between several stereoscopic modes. |
|
|
Opens forth the Lens Effects controls. Right-click to dock or undock them. |
|
|
Opens the Messages window. |


Color Corrections
The V-Ray VFB has a robust Color Corrections control (as seen in the image in the Overview) that is enabled with its icon (shown in the table above) which is in the lower left corner of the VFB window. Color Corrections include Exposure, Hue/Saturation, Curves, etc. and are all covered here.
Render History
The V-Ray VFB keeps a history of previously rendered images, and lists each with a number, thumbnail, and textual details in the Render history. This history can be accessed through the H icon at the bottom of the VFB window. The Render history can be docked to the VFB (as shown below) or can float separately. In addition to keeping history, this feature can display two images in the VFB for comparison (as shown below), which is revealed via a sliding division line. History files are stored as .vrimg files in a user-specified folder.
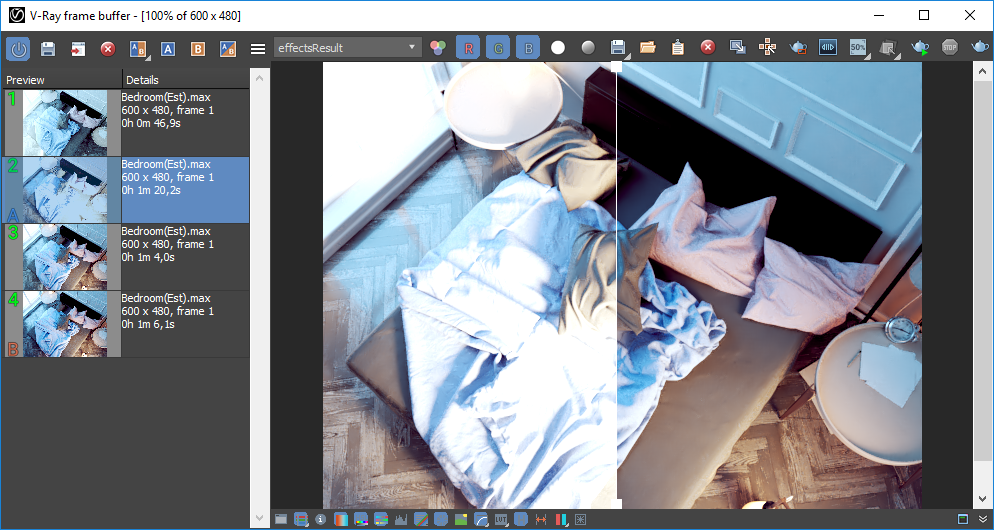
VFB with docked Render history, comparing A and B images with vertical division line
|
|
Enables the V-Ray VFB history. |
|
|
Saves the current image from the VFB to the render history. The image is placed at the top of the Render history listing. |
|
|
Loads the image selected in the Render history to the VFB. |
|
|
Removes the selected image from the Render history. |
|
|
Sets the currently selected image as image A for A/B comparison in the VFB. |
|
|
Sets the currently selected image as image B for A/B comparison in the VFB. |
|
|
Swaps the A and B images. |
|
|
Enables or disables the image comparison. Click and hold the button to switch between horizontal and vertical comparison. |
|
|
Opens a menu with two options: History Settings and Dock History. The History Settings options opens a window for specifying the location for the history and turning on auto-save. The Dock History option docks or undocks the VFB history. |


The keyboard keys from 1 to 9 can be used to quickly switch between the first 9 images from the history.
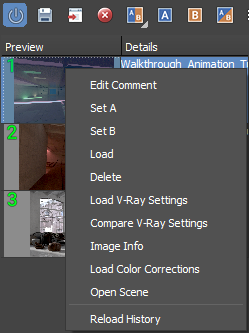
Right-clicking on an image in the VFB history brings up a pop-up menu with some useful options.
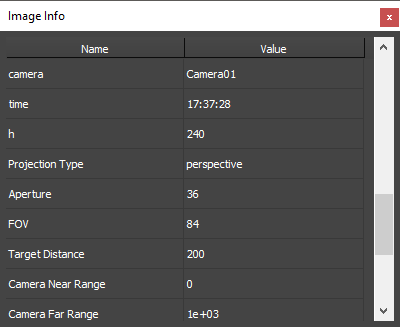
Image Info window
Edit comment – Allows you to add a text comment to the image; the comment appears in the "Details" column.
Set A – Sets the image as the 'A' image when comparing two images.
Set B – Sets the image as the 'B' image when comparing two images.
Load – Loads the selected image in the VFB (same as double-clicking on the history image).
Delete – Deletes the selected image from the history. The image is moved to the system's Recycle Bin and can be restored from there if needed.
Load V-Ray Settings – Sets the current render settings to the ones used to render the selected image.
Compare V-Ray Settings – Shows a table with the differences between the settings used to render the selected image and ones currently set in the V-Ray renderer.
Image Info – Opens a window containing detailed information about the image, including, but not limited to Camera, Aperture, FOV, Target Distance, V-Ray version, render time, and also custom attributes specified in the exr metadata of VRayOptionRE render element. Have in mind that the camera values are saved in system units. Also, the vrayrevison info displayed in the list is not related to the saved .vrimg file but to the current V-Ray build installed for 3ds Max.
Manually saved .vrimg files can also be added to the History folder, but they need to be saved with all image channels in one .vrimg file to keep the complete image info.
Load Color Corrections – Loads the VFB color correction controls from the selected image.
Open Scene – Opens the rendered scene in the viewport. This option works as long as the initial file path of the scene has not changed after the render.
Reload History – Re-reads the history image list. This may be needed if the history folder is updated outside of 3ds Max (f.e. from another 3ds Max session).
Render History Settings
This window allows the user to specify VFB History settings such as to what location the history will be saved, and the amount of disk space to use.
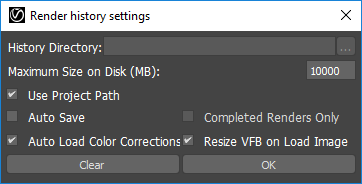
History Directory – Specifies the location where render history images will be saved as V-Ray Image files (.vrimg).
Maximum Size on Disk (MB) – Specifies the maximum amount of disk space to use for the render history images. When the history exceeds the specified amount, the oldest images will be deleted.
Use Project Path – When enabled, creates a new vfb_history folder to use as the History Directory within the current 3ds Max project directory.
Auto Save – When enabled, all rendered image will automatically be saved to the history.
Completed Renders Only – When enabled, only completed rendered images will automatically be saved to the history.
Auto Load Color Corrections – When enabled, color corrections saved in the stored image will automatically be loaded into the Color Corrections panel.
Clear – Clears all images in the render history.
Resize VFB on Load Image – When enabled, the VFB will be automatically resized to fit the loaded image.
Stamp Tools

|
|
Toggles open Stamp Tools at the bottom of the VFB |
|
|
Applies a stamp with rendering metadata to the image |
|
|
Opens the Stamp Variables window to make it easy to copy different types of information onto the stamp |
|
|
Align stamp options; Click and hold to change from Left alignment to Right alignment or Center alignment |
|
|
Change stamp placement from align Bottom to align Top |
|
|
Choose Font window to change font, its style and size |


Stamp Variables
Stamp variables can be typed directly into the stamp textbox with a % symbol before and separated with a | symbol. Example: %rendertime | %frame | %camera
Alternatively, the Stamp variable window can be used to select/highlight variables and clip on the Copy to stamp button to add them to the stamp textbox
|
Field |
Description |
|
vraycore |
Version of the V-Ray core |
|
rendertime |
The render time for the last completed frame |
|
vrayversion |
Internal V-Ray version |
|
filename |
Max project file name |
|
frame |
Current frame number |
|
primitives |
Number of internal V-Ray primitives used in rendering |
|
computername |
The name of the computer this frame was rendered on |
|
date |
Date at the end of rendering |
|
time |
Time at the end of rendering |
|
w |
Width |
|
h |
Height |
|
ram |
Physical memory available (RAM) |
|
vmem |
Virtual memory available |
|
mhz |
The speed in Mhz of the CPUs |
|
cpu |
CPU type and number of CPUs available |
|
os |
OS version |
|
camera |
Camera name |
|
numPasses |
Sampling level reached: number of passes |
|
numSubdivs |
Sampling level reached: number of subdivs |
|
noiseThreshold |
Noise threshold reached (progressive sampler only) |
VFB Shortcuts
These shortcuts navigate through the VFB image. Please note that VFB window must have the current focus for the shortcuts to have effect:
|
Mouse |
Description |
|
CTRL+Left click, CTRL+Right click |
Zoom in/Zoom out |
|
Mouse wheel |
Zoom in/Zoom out |
|
Double-click left button |
Zoom to 100% |
|
Right click |
Show the info window with the properties of the last pixel clicked. To see the info non-stop, turn on the info button |
|
Page Up/Page Down |
Switch between render elements |
|
Middle button dragging |
Pan (hand tool) |
|
|
|
|
Keyboard |
Description |
|
+ / - |
Zoom in/Zoom out |
|
* |
Zoom to 100% |
|
Arrow keys |
Pan left, up, right, down |
|
1-9 |
Load the respective image from the VFB history |
|
Ctrl+C |
Copy the VFB image to the Windows clipboard; the image is copied exactly as it appears on the screen (meaning sRGB/LUT/OCIO etc corrections are applied). The full resolution image is copied to the clipboard, even if the VFB view is zoomed in/out. |

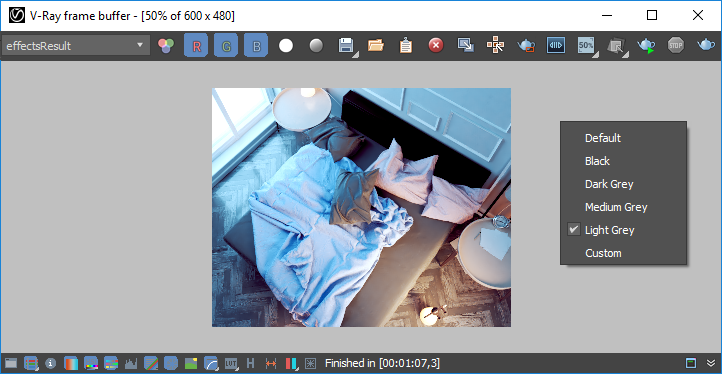
Changing the Background Color
To change the background color of the VFB, right-click on the background and select one of the options from the pop-up menu.
VFB IPR Options
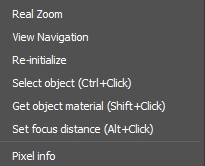
View Navigation – Requires a camera view. Adjusts the view angle from the render in the VFB instead of in the viewport. Simply click and drag in the rendering area of the VFB window.
Real Zoom – When enabled, scrolling will not function in zooming the pixels of the rendered image but will move closer or further from the rendered geometry.
Pause/Resume – Pause/resume rendering.
Re-initialize – Restart rendering.
Select object – Directly select scene objects by clicking on them in the VFB rendering area. You can use the Ctrl + left mouse button keyboard shortcut instead.
Get object material – Pick a scene material from an object that is being rendered. You only need to click on that object in the VFB rendering area and the material editor will open with it. You can use the Shift + left mouse button keyboard shortcut instead.
Set focus distance – Sets the target distance for the Depth of Field effect to the location clicked in the VFB rendering area. You can use the Alt + left mouse button keyboard shortcut instead.
Note that the keyboard shortcuts work only within the VFB window.
The Undo shortcut (Ctrl+Z) for these actions will not work within the VFB window though. It only works when the focus is on the 3ds Max windows.
Pixel info – Opens the standard V-Ray VFB pixel information window.
![]()
Render Region
Render region can be used in both IPR and Production modes to isolate only part of the frame for render. Usually, when a render region is used, you would like to save the whole frame instead of the region only.
Saving single channel .exr files ignores the render region and always saves the full frame. This applies when saving the .exr from: VFB > Save to separate files/Save current channel, Render Settings > Common tab > Common Parameters > Render Output and Render Settings > V-Ray tab > Frame buffer > Separate render channels. (V-Ray ignores 3ds Max's Image Region option residing in the 3ds Max native file output dialog under Setup > OpenEXR Configuration window.)
Saving multi-channel .exr files writes just the render region data in the file by default but it can be set to save full frame instead. If the file output is saved through Render Settings > V-Ray tab > Frame buffer > V-Ray raw image file, in order to save the render region with the rest of the frame, add VRayOptionRE render element and set its exr data window option to Whole Image. Saving multi-channel .exr files from VFB > Save all channels to single file will save render region when such is enabled from the VFB. This happens even if you have selected a render region on top of the already rendered frame, without an actual region used in the rendering process. Saving full frame from VFB is performed when the VFB region is disabled.
Notes
-
The V-Ray VFB does not display the G-Buffer layers (like Coverage etc.)
-
The V-Ray VFB does not work with strip rendering
-
The V-Ray VFB does not work with rendering to fields
-
Even though you select the V-Ray VFB as your output, the 3ds Max VFB is still created and thus takes additional memory. If you want to reduce that memory, you need to uncheck the Get resolution from MAX option, set the 3ds Мax resolution to a low value like 100 x 100, and then select your real output resolution in the V-Ray VFB options.
-
If you have selected an output image file from the Common tab of the Render Scene dialog, V-Ray will fill out the 3ds Max RFW, and this will be saved as your image. If you want to save the V-Ray VFB instead, you should use the Split render channels or Render to V-Ray raw image file option of the V-Ray VFB.
-
The OpenEXR file format is an open file format for high dynamic range images originally developed by Industrial Light and Magic. The official site of the OpenEXR file format is http://www.openexr.com/
-
When using the IPR right-click options, the primary 3ds Max window needs the cursor focus to use Ctrl+Z to Undo.
-
If Lens Effects or the VRayDenoiser render element are enabled, then the RGB Color channel is saved with the name RGB_color and the effectsResult channel is saved as effectsResult when saving all channels from VFB.
-
If an 8-bit file is saved through the VFB or the Render Output / Save image settings, the sRGB gamma curve is embedded and the image appears as in the frame buffer when loaded in an external image viewer. If a 32-bit (exr, hdr, tif) image is saved, it remains linear and relies on the external image viewer to handle the gamma.
-
The VFB test resolution is ignored for command-line rendering and Backburner jobs. Test Resolution button is inactive in IPR if Fit resolution to VFB is enabled.