Image Sampler
This page provides information on the Image sampler rollout in the V-Ray tab of the Render Settings.
Overview
In V-Ray, an image sampler refers to an algorithm for calculating a pixel's color based on the colors within and around it.
Each pixel in a rendering can have only one color. To get the color of a pixel, V-Ray calculates it based on the object's material, direct light striking the object, and indirect lighting in the scene. But within a single pixel there might be multiple colors, which may come from multiple objects whose edge intersect at the same pixel, or even difference in brightness on the same object due to changes in object shape or falloff and/or shadowing of light sources.
To determine the right color for such a pixel, V-Ray looks at (or samples) colors from different parts of the pixel itself as well as the pixels around it. This process is called image sampling. V-Ray includes two main image samplers, each with its own approach to sampling and its own parameters: Progressive and Bucket.
![]()
Image courtesy of Tuna Unalan
Multiple colors within a single pixel. What color should the pixel be?
UI Path
||Render Setup window|| > V-Ray tab > Image sampler (Antialiasing) rollout
Example: What is anti-aliasing?
One of the purposes of sampling is to improve anti-aliasing. The following example shows the basic difference between an image with anti-aliasing and one without:

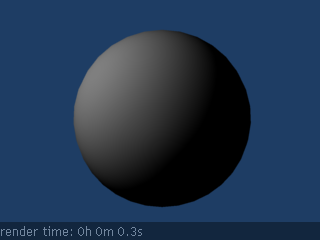
No anti-aliasing (Bucket rate sampler; Max subdivs Off, Min subdivs = 1)

Close-up view
Anti-aliasing on (Bucket sampler; Min subdivs = -1, Max subdivs = 2)
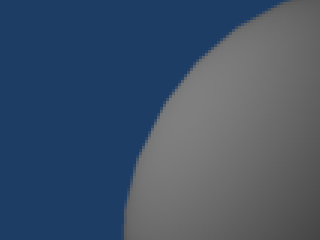
Close-up view
In the image with anti-aliasing, the edge of the sphere appears smoother than in the image without anti-aliasing. In the second set of images, the pixels at the edge of the sphere have a color between the gray of the sphere and the blue of the background, giving the edge of the sphere a smoother appearance.
V-Ray performs anti-aliasing by sampling colors in areas where one color meets another, as with the edge of the brown sphere meeting the blue background above. The choice of image sampler and the parameter settings determine the effectiveness of anti-aliasing for any particular scene.
Anti-aliasing within a material can also be affected by filters, such as those included with 3ds Max. V-Ray image samplers support most 3ds Max filters.
Default UI Mode
The following parameters are visible when the Render UI Mode is set to Default.
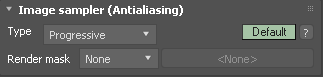
Type – Specifies the image sampler type. Depending on this choice, an additional rollout opens up below the Image sampler (Antialiasing) rollout with specific settings for that sampler type.
Progressive – Progressively samples the entire image and refines the details over time. For more information, see the Progressive Image Sampler page.
Bucket – Takes a variable number of samples per pixel depending on the difference in the intensity of the pixels. For more information, see the Bucket Image Sampler page.
Render mask – Enables the use of a render mask to determine which pixels of the image are calculated. The rest of the pixels are left intact. This feature works best with the V-Ray Frame Buffer as the render window and Type set to Bucket. The following choices are available:
None – A render mask is not used.
Texture – Render mask is a texture. Black values in the map define pixels which are not rendered. Pixels with any other values are rendered. The texture should use the screen mapping type.
Selected – Only pixels that belong to the currently selected object(s) are rendered. V-Ray still calculates the entire image, but only renders parts that belong to the selected object(s). This mode is useful if you want to isolate or re-render just some objects from the scene.
Include/Exclude list – Same as Selected, but objects are selected by list.
Layers – Renders only objects that belong to the currently selected layer.
Object IDs – Renders only objects with specified Object IDs. Separate Object IDs with a comma (,).
For more information on how to use the Render mask feature see the Render Mask tutorial.
Advanced UI Mode
The following parameters are added to the UI when in Advanced UI Mode.
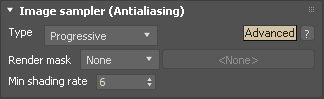
Min shading rate – Controls the number of rays shot for Anti-aliasing (AA) versus rays for other effects like glossy reflections, GI, area shadows, etc. This setting is especially useful with the Progressive image sampler. Higher values mean that less time is spent on AA, and more effort is put in the sampling of shading effects. For more information, see the Min Shading Rate Example.
Note: In a scene previously saved with V-Ray 2.x, the Min shading rate parameter is set to 1 in order to produce the same results as the previous V-Ray versions.
Expert UI Mode
The following parameters are added to the UI when in Expert UI Mode.
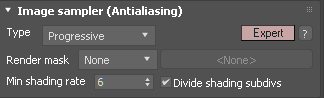
Divide shading subdivs – When enabled, for each image sample V-Ray divides the number of samples for lights, materials, etc. by the number of AA samples in order to achieve roughly the same quality and number of rays when changing AA settings. For example, if you have 4 AA subdivs (=16 image samples) and 8 light subdivs (=64 shadow rays), V-Ray traces 4 (=64/16) shadow rays for each image sample. This also means that in order to sample a particular blurry effect with more than one sample, its subdivs must be increased above (sometimes far above) those of the image sampler. However, some users (especially those coming from other render engines) might find this automatic division inconvenient. When this option is disabled, the subdivs of lights, materials, etc. specify the number of subdivs for each image sample, thus allowing for more precise control of the sampling for these effects. With this option disabled, the above settings of 4 AA subdivs and 8 light subdivs trace up to 1024 (=16*64) shadow rays, although V-Ray still tries to reduce that amount depending on the Global DMC sampler settings.The Min. shading rate parameter continues to be valid for convenience.
If you are not sure whether to enable or disable the Divide shading subdivs option, leave it enabled (its default state).
Example: Min Shading Rate
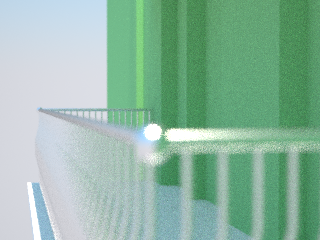
Min Shading rate = 1
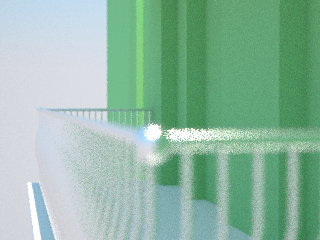
Min Shading rate = 16
Both of the images above rendered with the Progressive image sampler for the same amount of time. With Min Shading rate set to 16, at least 16 GI rays are shot for each AA ray, which produces smoother GI, but overall leads to less samples left for the DOF effect.
Choosing the Best Image Sampler for the Situation
No one image sampler is best for all scenes or workflows. Choosing the best image sampler is usually a matter of experimentation, but there are a few guidelines you can follow. For additional information, see the Progressive Image Sampler and Bucket Image Sampler pages.
-
Setting Image Sampler Type to Bucket is the same as the Adaptive Type in previous versions of V-Ray.
-
With the Bucket type, disabling Max. Subdivs will also disable the Noise threshold and will match the Fixed sample behavior in earlier versions of V-Ray.
-
Progressive is useful when it is necessary to see overall results quickly (like when placing light, building shaders, or general Look Development work) because it generates the whole image at once and progressively cleans up the noise in it. Additionally, the render can be stopped at any time before resolving completely.
-
Progressive is also helpful when a set amount of time to spend per render is needed. This can also be useful when rendering test animations, where the entire sequence must be rendered within a certain time frame.
-
Combining the VRayDenoiser with Progressive renders can help with cleaning up render noise. If the Denoiser's Update button is used when manually cancelling a render, the noise levels will be adequate enough to use the denoiser to avoid splotches and/or other unwanted effects. Also note that in 3ds max 2017, there is a Stop button in addition to the Cancel button in the progress window. After clicking Stop, V-Ray will begin denoising the render.
-
Using Bucket when running Distributed Renders can be helpful for cutting down on network traffic and reducing the loss of information if work is not completed by one or more DR machines.
Image Samplers and RAM Usage
Image samplers require a substantial amount of RAM to store render information. This is especially true for the Progressive sampler, which stores the entire image in memory before beginning the rendering process. The Bucket sampler, on the other hand, stores only the summed result of all sub-samples for a pixel and so usually requires less RAM. Using large bucket sizes might require more memory.